The Shira Route — Kilimanjaro via the High Plateau
Overview
Daily summary
Day-by-day itinerary
Prices
FAQs
How does the vehicle-assisted start differ from our Lemosho route?
Shira begins with a vehicle transfer directly to the Shira Plateau at approximately 3,500 m, bypassing the lower forest and moorland that Lemosho ascends on foot from the western trailhead. This gives immediate access to the plateau’s open scenery but means arriving at altitude before the body has acclimatised.
Does fitness replace acclimatisation on the Shira Route?
No. The abrupt arrival at 3,500 m means the body still needs the plateau days to adapt, and prior high-altitude experience is strongly recommended. Fitness does not replace acclimatisation; the plateau days remain essential regardless of how fit you are.
Is the published eight-day itinerary priced on request?
Yes. The Shira Route is not included in the 2026–2027 approved standard rate table; both the seven- and eight-day Shira itineraries are quoted on request. Standard trek inclusions and exclusions are shown on the page for reference.
Elevation:
Distance:
Time:
Habitat:
Moshi to Shira Plateau — Shira 1 Camp
The Shira Route begins with a vehicle transfer from Moshi directly to the Shira Plateau at approximately 3,500m — bypassing the lower forest and moorland sections that other routes ascend on foot. This is the route's defining characteristic and most significant challenge: arriving immediately at altitude before the body has had time to acclimatise. After completing park formalities, a short walk reaches Shira 1 Camp. Adequate rest and hydration are critical on this first day.
Shira 1 Camp to Shira 2 Camp
Walking east across the Shira Plateau, Kibo's summit comes into full view. The trail passes through heathland, the Cathedral Rocks and several seasonal streams before reaching Shira 2 Camp at the eastern plateau edge. Views in all directions are extraordinary — this is one of the most visually impressive second days of any Kilimanjaro route.
Shira 2 Camp to Moir Hut
Continuing east and upward, the route climbs to Moir Hut at the base of the Lent Hills. This quieter campsite offers excellent acclimatisation conditions, and an optional afternoon walk into the Lent Hills is recommended for those feeling strong. The increasing altitude and decreasing vegetation begin to signal the alpine desert ahead.
Moir Hut via Lava Tower to Barranco Camp
We climb through increasingly rocky volcanic terrain to Lava Tower — the route's high-altitude acclimatisation point at 4,630m. After lunch here, we descend into the dramatic Barranco Valley and camp beneath the Barranco Wall. The classic climb-high, sleep-low principle works to excellent effect today, helping the body adapt before the final push.
Barranco Camp to Karanga Camp
The Barranco Wall scramble opens the day — a memorable, non-technical rock climb with steep exposure that rewards climbers with spectacular views of the southern glaciers. From the wall's summit, we traverse ridges to Karanga Camp. This shorter, well-paced day provides important rest and acclimatisation before the Barafu push.
Karanga Camp to Barafu Camp
Joining the Mweka trail junction, we climb steadily through a barren alpine landscape to Barafu Camp. Mawenzi and Kibo can both be seen clearly in good conditions. After arriving at camp, we rest, eat an early dinner and carefully prepare headlamps, summit clothing and water for the midnight departure. The camp feels exposed and dramatic at this altitude.
Barafu Camp to Uhuru Peak to Millennium Camp
Around midnight we set off in darkness, zigzagging over scree to Stella Point on the crater rim, then pressing on past glaciers to Uhuru Peak — Africa's highest point. After celebrating and photographing the summit, we begin the long descent via Barafu to Millennium Camp. The post-summit descent is tiring but the sense of achievement makes every step worthwhile.
Millennium Camp to Mweka Gate
After breakfast and the crew farewell, we descend through moorland and into the lower rainforest to Mweka Gate. The contrast between the barren summit world and the warm, lush forest below is striking. Park formalities and summit certificates are completed at the gate, then our vehicle transfers the group back to Moshi for a final celebratory dinner.
Northern Circuit
Moderate
Exceptional
Very Low
Very High
Lemosho
Medium
High
Rongai
Very Good
Low
Good
Machame
Moderate–Challenging
Excellent
Shira
Challenging
Marangu
Umbwe
Very Challenging
Dramatic
Lower on short itineraries
Shira Route — Kilimanjaro Climb | Exuberant Kilimanjaro
Climb Kilimanjaro via the Shira Route — an 8-day approach beginning on the Shira Plateau at 3,500m, sharing the upper mountain with Lemosho and Machame routes with excellent plateau scenery and challenging high-altitude acclimatisation.
Kilimanjaro Climb Routes
A unique 8-day approach that begins with a vehicle transfer directly to the Shira Plateau at 3,500m — bypassing the forest for an immediate immersion in the plateau's vast, open moorland with outstanding views of Kibo from the first morning.
Exuberant Kilimanjaro
Route Overview
Why choose the Shira Route?
The Shira Route is closely related to the Lemosho Route but begins with a vehicle transfer directly to the Shira Plateau at 3,500m, skipping the lower forest and moorland sections that Lemosho ascends on foot. This creates both an advantage — immediate access to the plateau's extraordinary open scenery — and a challenge: arriving at altitude without the gradual ascent profile that aids acclimatisation. Because of this abrupt altitude gain, Shira is best suited to climbers who have prior high-altitude experience, and acclimatisation time on the plateau remains essential regardless of fitness. From Moir Hut onward, Shira and Lemosho share the same trail through Lava Tower, Barranco, Karanga, Barafu and the Mweka descent. The overall experience is one of dramatic, plateau-dominated scenery combined with the full Southern Circuit experience.
Important Notes
Duration
Summit Elevation
Difficulty
Start Elevation
How the altitude builds
The Shira Route is distinguished by its vehicle-assisted high start: a transfer delivers climbers directly to the Shira Plateau at approximately 3,500m, rather than the lower forest walking start of our Lemosho itinerary. Days 1–3 cross the plateau before the route joins the Lemosho path for the remaining five days. This immediate altitude gain is why Shira is rated challenging; prior high-altitude experience is strongly recommended, and the plateau days remain essential for acclimatisation regardless of fitness. The day-by-day itinerary below gives the altitude of each camp.
Route Map
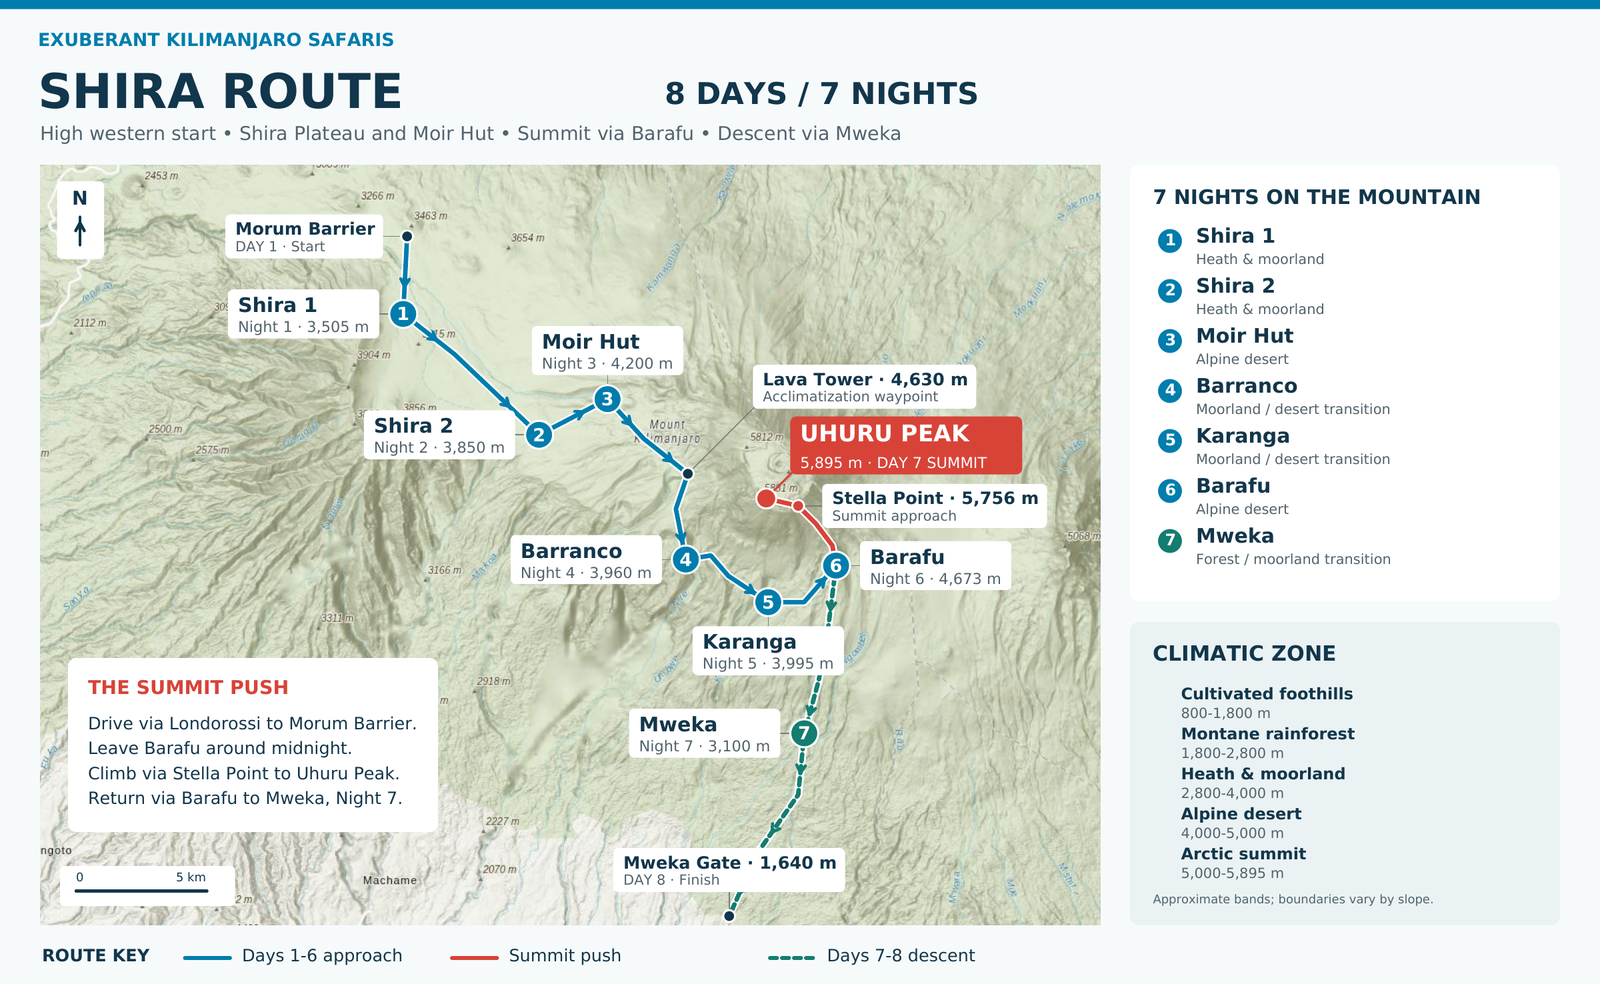
Shira Route Map — 8 Days / 7 Nights
Shira 8-day Kilimanjaro route map from Morum Barrier showing seven overnight stays and the summit push from Barafu.
View full-size Shira map
Day by Day at a Glance
8 Days Standard Shira Itinerary
Standard Shira 7 Days
Standard Shira 8 Days
Shira Pricing
Compare Routes
How does the Shira Route compare?
Route
Minimum Days
Recommended Days
Scenery
Traffic
Shira FAQs
Route-specific questions
An obligatory crew tip of at least US$600 per participant is payable in addition to the trek price. Other exclusions and applicable supplements also apply.